Category Archives: How-to

How To Protect HDMI Inputs From Being Toasted By Lightning

Protect HDMI Inputs


So you have a super duper Home Theatre system complete with a jiffy HD Projector and a top-of-the-line AV Receiver linked by a 50-foot (15-metre) HDMI cable that snakes overhead in the ceiling. One end is connected to the HDMI input port of your overhead HD Projector while the other end is connected to the HDMI output port of your AV Receiver across the room.

What happens when there is a severe thunderstorm and there is one or more lightning strikes nearby? Does your system go on the blink? If yes, then you share the same bad experience as I have. The close proximity lightning strike has induced a large voltage spike  in your long HDMI cable that completely toasts your HDMI ports. If you’re “lucky” then maybe only either the Projector’s or the AV Receiver’s  HDMI port gets toasted. More likely, both will be zapped.

After that has happened to me 3 times in as many years, I decided to be proactive as I was getting embarrassed submitting my home insurance claim every year. Not to mention the inconvenience of the downtime pending repairs. I installed my solution early this year and having survived 2 severe thunderstorms since the installation, I am confident this is a viable solution to protect HDMI inputs from being toasted by lightning-induced spikes in the long HDMI cable of a home theater system. Read on.

hdmi-switch protect HDMI inputsThe solution calls for two HDMI Switches. I searched for a simple 2-to-1 HDMI Switch but the simplest I found is this 3-to-1 HDMI Switch. I wanted a mechanical switch but finally settled for this electronic switch because it has a remote. This makes the switching convenient when the switch is mounted at the Projector, ceiling-high.

AV-receiver-hdmi-switch protect HDMI inputsInstall one of the HDMI Switches to the HDMI Ouput of the AV Receiver. In my case, I connected Port 3 of the switch to the AV Receiver’s HDMI Output. The switch’s output port is then connected to the long HDMI cable. The other end of the HDMI Cable connects to Port 3 of the second HDMI Switch mounted projector-hdmi-switch protect HDMI inputsat the overhead Projector. The output port of this switch connects to Projector’s HDMI Input port. That’s it. When the system is on, I use the remote to switch to Port 3 of both switches. When I have finished viewing, I switch to the un-used Port 1 of both switches, before shutting down the system.

The cost? Only RM80.00 (USD24.00) for each HDMI Switch.  I reckon that in the event of a really bad lightning strike, it’ll be a USD24 fuse. But so far, neither switch has failed.

Does this help you? Share your experiences here.

Update 10-Nov-2014

Last night there was no video output from my Projector. The bulb was OK but there was no display. A quick change of the HDMI input port from HDMI 1 to HDMI 2 was to no avail. A quick visual check showed that the light on the HDMI switch at the Projector went out, like there was no signal reaching it from my AV receiver. Checked the HDMI output from the AV receiver; there was output when connected directly to the TV. It appeared as if either one or both of the HDMI switches were toasted, but when swappped out to test each at the AV receiver end showed both were OK. Horrors! Could it be that my projector’s HDMI ports are both dead? I refused to believe that; if anything, the HDMI switch should be toasted first. I am confident of that. That left one long shot to try out. Maybe the signal from the AV receiver had somehow degraded and was a trifle bit too low at the Projector end?   Luckily I have a HDMI repeater. I connected the HDMI repeater to the Projector end of the long HDMI cable before connecting to the HDMI switch. Voila! Happiness! Problem solved.

How To Ensure Untangled Storage Of Cables

I first saw this tip at http://www.lifehack.org/articles/lifestyle/100-life-hacks-that-make-life-easier.html   by Brian Lee. It sure looked neat and I thought that I’ll attempt my version of it and document the effort here.

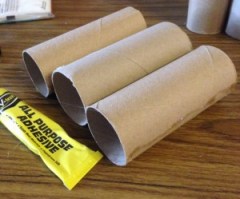
tissuecores8601.  Start by collecting the cylindrical cores  of  used tissue rolls.

2.  At the same time, look for a suitable box. I recommend a box that is about 1-1/2 times deeper than the height of the cylindrical core.

threecores8603.   Stick the cylindrical cores together in a row as shown here.


coresinbox860


4.  Mount them in the box. Voila! A really neat cable storage box.

Now go and finish off the additional rows.


finishedrow860* Warning!
Your addiction with this project may result in an excessive consumption of tissue rolls.

How to get the GPS Co-ordinates from Google Maps

Everyday Life’s small nagging issues:

How to get the GPS Co-ordinates from Google Maps?

1.  Type in the location to search in Google Maps.

2.  See the drop-pin that points to your desired location? Place your cursor on the pin-tip and right-click, hover over it and a pop-up should give you that locations co-ordinates in decimal.

3.  If the pop-up does not appear, right-click the cursor on the pin-tip and select “What’s here”. The co-ordinates in decimal will now appear in the search bar on the top of the map.

4.  If that’s (decimal) what you want, you’ve got it. If you want the co-ordinates in degrees, minutes, seconds (DMS), then either manually convert the decimals or use a converter such as

Now you’re ready to use your GPS, whether it reads decimal or DMS.


How Not To Be Embarrassed By Your DSLR

budgetcameras

So you want to be a hot-shot brilliant DSLR photographer?

Update 16-Jan-2014:  See the related gallery “The Shootout Between a DSLR and a Point-N-Shoot”.

There are very few things in Life that are as humiliating and demoralizing as when a guy with an expensive, massive, mean- looking DSLR takes pictures beside his spouse who is snapping away on a tiny point-n-shoot camera and then friends go “wow!” looking at the spouse’s snapshots and saying “uh ah, not bad” at the guy’s should-have-been-awesome photos. What is wrong with this picture!? … pun intended. If that sounds familiar to you and you can relate to it, or better still- if you do NOT wish to be that guy, read on.

DSLR_AE First attempt with DSLR in AE mode.


No-one is DSLRFullAutowatching, set the DSLR to full auto.


compactSpouse’s compact point-n-shoot camera.


iPhone4Same scene taken with iPhone 5, just for the heck of it.


From the above, it is easy to see that except for the first photo, the rest are actually quite acceptable “keepers”.

What went wrong?

If you attend a photography class with a live instructor to guide and hold your hands, so to speak, this scenerio may not apply to you; lucky you! For the gung-ho, teach-yourselves (almost everybody else), this one’s for you. Remember, this is strictly for the NEW newbie. If you’re already ahead of the class here, just shut-up and post your comment at the end of the article.

Here goes:

1. Forget about everything that you’ve read elsewhere or what other “lessons” you’ve been taught about the creative modes of your DSLR.
The absolute first thing you’ve got to focus on is how to get a really “tack-sharp” image. That’s pro-speak for a super sharp in-focus image.
You can try everything that the books or instructor tell you, but you will lose heart and interest if your photos turn out any less sharp than someone’s simple auto camera.

2. The secret to a beginner’s DSLR camera getting a sharp image is Shutter Speed. Some experts will tell you something like shoot at your len’s sharpest aperture. Right, but what’s that and why? Think about it: the reason your picture is blurry is usually because of shaky, unsteady hands. The second most likely reason is because the subject is not perfectly still ( the kid/pet is simply behaving as a kid/pet or the breeze simply will not pause for you or life is just being unkind to you ) .  So you see, as long as you have a sufficiently fast shutter speed, much faster than your hands can shake, much faster than the kid/pet can move, much faster than the flower can flutter in the breeze, you’re already 95% home. OK, I made that up. I don’t know the percentage but I certainly know that you are more likely to get a decently sharp image than not.

3.  Yes, there are probably myriad other reasons why a picture is not sharp, but I dare say the above 2 reasons account for 98% of all new-newbies’ bane. Yes, I made up that percentage, too, just so you can get the picture, get it? And don’t tell me the problem is “out-of-focus” because I’m assuming you’re humble enough to engage your camera’s auto-focus. You just have to check that the auto-focus is indeed focussing on your subject of interest. My Tamron wide-range (18-270mm) lens is notorious for its misbehaving auto-focus at critical times. Yet, I can’t bear to part with it. Sigh! But that is another story.

4. And, oh, the book/expert tells you to use a tripod to eliminate that shake and vibration. But I’m addressing the 99% of new-newbies who have just unwrapped/unboxed  his brand new super duper DSLR and who can’t wait to create the highly anticipated brilliant photos he sees from his books/magazines. Who uses a tripod in the first 100 days of trying out his DSLR for the first time? C’mon!

5.  Here are the guidelines for Shutter Speed priority or Time Value (Tv) on the dial of a Canon DSLR.

  • A good rule-of-thumb is that the minimum shutter speed, secs., = 1/focal length (mm) of the lens used.  For example, if you are using a 50mm lens, then the minimum shutter speed is 1/50 sec. In practice, a new newbie is well-advised to use 1/125 sec for a hand-held shot. And as your focal length gets longer, the vibration risk gets higher with the increased magnification. So while the guideline prescribes  min. 1/200 sec for a 200mm lens, say, push the shutter speed as high as your aperture will adjust to maintain correct exposure. If you find that you need a higher speed than your aperture will allow, you may need to adjust for a higher ISO setting to get that speed.
  • Save in RAW, if possible, so that your less-than-perfectly exposed picture has a chance to be saved. On the other hand, if you used too slow a speed and your picture is blurry due to shakes, it’s game over.
  • In Tv mode for Canon (S-mode for Nikon), set the shutter speed faster than the rule-of-thumb prescription and check the exposure to see if the aperture can handle the selected speed for a given ISO. If not, then dial downwards the speed until the aperture value stops flashing. If that is not possible without going below the rule-of-thumb value, stop! Increase the ISO and try again to get the fastest possible speed.
  • Remember, we are talking about a new newbie just wanting a tack-sharp photo and it’s not about stop-motion, panning, special effect or whatever. Just a tack-sharp photo that you won’t be embarrased to show off, side-by-side with your spouse’s P-N-S photo. So just start with the fastest possible shutter speed. Aperture Priority (Av) and everything else can wait.
  • If you still get rubbish blurry shots, then maybe take a step back and dial in “Full Auto” on your DSLR. Look, no-one needs to know. It’s your own private classroom, after all. After each shot ( quite nice shot, isn’t it?), check the photo information to see all the data and learn. Use your DSLR in Full Auto as your  private tutor. You can’t fail.
  • And I just have to add this parting shot: take as many shots as you possibly can. Memory storage is cheap now, not like expensive films in the past. You could even set your  camera to take continuous shots. I read somewhere that even the Pros do it. It’s not a matter of “kia-su”. It gives you the increased odds of getting a keeper. The rest you can just delete before you show off your terrific photo to everyone, right?

There you have it. Your first 100-days of embarrassment-free, confidence-boosting DSLR photography adventure begin.

You’re welcome.


You ought to be able to do better (with your fancy DSLR) than this shot taken with my iPhone 5, while a steady breeze is gently rocking the flower.

grasshopper


Footnote:
On the issue of gender. This article refers to a male DSLR-hotshot-wannabe simply because I’m male and I’m writing largely of my personal experience. No disrespect is meant to any female reader.


Archive Your Audio Cassettes As MP3

Update:  7-Sept-2014

You hate the incessant tape hiss of your old cassette tapes, right? Well, good news! Audacity has a noise removal feature that will minimise your tape hiss to an insignificant level when you convert your tape recordings to MP3.  Here’s how to do it:

1.  Follow the setup procedure described below, in the earlier tutorial.

2.  This time, after saving your recording as an Audacity Project file ( .aup ),  scroll through the length of your recorded waveform to locate a silent passage (ie. between songs) which is essentially the background tape hiss. Highlight/select this portion of the waveform.

3.  On the Audacity top menu, select “Effect” -> “Noise Removal” -> click on “Get Noise Profile”. That’s the portion of tape hiss which you highlighted in Step 2.

4.  Next, on the Audacity top menu, select “Edit” -> “Select” -> “All”. This will highlight/select the whole recording.

5.  Finally, on the Audacity top menu, select “Effect” -> “Noise Removal” -> “Step 2 ……… stay with the default settings, Noise : remove” -> click “OK”.

6.  Audacity will now do its magic; it will scan the whole recording and remove whatever “noise” that’s comparable to the “noise profile” . Depending on how long is your recording, it may take a few minutes to complete this process.

7.  Now you can export the .aup file to MP3, minus the irritating tape hiss.  That’s it.  Enjoy!


If you are a music lover and if you are now a forty-something or more,  chances are that you will have a treasure trove of precious cassettes ( and maybe vinyl records or -gasp!- even 8-track audio cartridges) that you want to archive in your  hard disks or thumb-drives. Well, here’s a neat way to do just that.

Things you need:

1.  A cassette player with line out (or at least headphone output); preferably a stereo-player with USB output for easy connection to a PC.

IMG_5279_1038Most cassette players should be adequate. I bought a no-frills stereo-player with USB output for USD18.00 online that does the job well.


Audacity-logo-r_50pct2.  An audio capture software that converts the tracks to MP3.  There is a free software, Audacity, that will do just that.

The cassette player which I bought online came with Audacity on a CD but it was an old version. You can easily download the latest version from http://audacity.sourceforge.net/
Audacity is such an awesome software that you can easily get lost in the multitude of functions and features. Stick with me here, and I’ll walk you through the mere essentials you need to get our immediate task done.
To me, Audacity is to Audio that GIMP is to Images/Photos; you get the picture.

The Procedure

1.   Load your cassette into the player and connect the  player to the PC with the USB cable.  Do this before starting Audacity so that the software can recognise a USB device is connected.

2.  Start Audacity.
a.  Choose 2 (stereo) input.
b. Set USB device as your input. Do not select stereo mix for your input. If there is no USB option available, choose Transport > Rescan Audio Devices.
c. On the “Advanced” tab, in the “Default Format” section, make sure the drop-down menu is set to “2 channel 16 bit 44100 Hz”.
d. Enable the Meter Toolbar and select Monitor Input. Start your cassette trial playback and aim for a maximum peak of around –6 dB.
e. Stop and rewind your tape and you’re ready to go. Start the player and simply press the red Record button in Transport Toolbar to start recording from the player.
f. Save the project as a Audacity Project File ( .aup) and then export as MP3. That’s it!


How To Fix A Plastic Bolt Without A Washer

While this Tip shows a quick-fix to a problem with securing a toilet seat, the same method can be applied to similar problems with other plastic situations.

seatA toilet seat, usually with a hinged cover, is bolted to the toilet bowl for a flush system. The bolt is usually made of plastic with one end flared to secure the seat to the bowl. The problem is, very often the flared end of the plastic bolt slips right through the hole of the hinge’s base. You can get a metal washer but it would rust in no time. Anything else (stainless steel washer, plastic washer, etc) would be too much of an effort to find/buy, if at all available.

seat-3A view of the component parts. The seat, the hinge, the plastic bolt and nut.


seat-5aSee the bolt inserted in the hinge but is able to slip out of the hole.


seat-6aAll that’s required. A chisel-like tool ( a large screwdriver will do fine ) and a hammer ( or a rubber mallet, if you are a stickler about using the right tool ).


seat-7Use the screwdriver and hammer to make indentations in the plastic bolt’s flared end.


seat-8Compare the two bolts. One has the indentations completed.


seat-9Both completed. Just a minor tip here: in a paired situation ( two bolts, two lamps, two batteries…etc.) always repair both/change both together. If one has failed, most likely the other will fail soon too.

seat-10The bolts now stay well in place in the hinge. Re-bolt the seat to the toilet bowl and we’re done..